
Reconciling your bank account in accounting software can sound daunting, but in practice it’s usually very straightforward. All you’re really doing is reviewing the money coming in and out of your bank account and assigning each item to the correct place in your accounts.
Every accounting system has its own chart of accounts (a list of all the available codes you can use), and most will let you add custom codes to suit your business. The exact process varies between software providers, but the walkthrough below shows how to do it in Xero.
All screenshots referenced are from Xero’s demo company. If you want to explore this safely, click your organisation name in the top‑left corner of Xero and choose Change Organisation.
Getting to the Reconciliation Screen
You can reach the bank reconciliation screen in two ways:
- From the Dashboard, click Reconcile X items
- Or go to Accounting → Bank Accounts
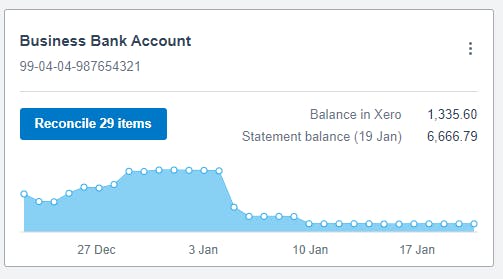
You’ll then see a list of all unreconciled transactions waiting for review. There are several ways to reconcile a line on the bank account. The simplest ways are listed below.
A Note About VAT
If you’re VAT‑registered, there are a couple of important points to remember:
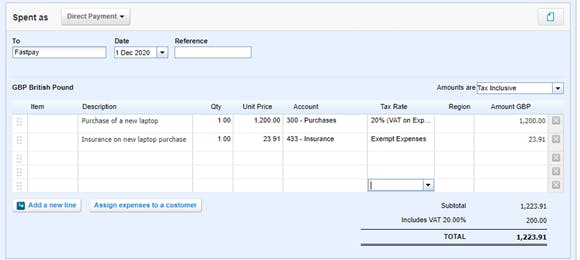
- Sales must have the correct VAT rate applied. If you raise invoices in Xero, VAT is handled at the invoicing stage. If you’re coding transactions directly from the bank feed, you'll need to make sure the VAT rate is being selected when you classify the transaction. This will come up as Tax Rate on the right-hand side, which you can see on the below screenshots.
- Purchases can only have VAT reclaimed if you hold a valid VAT invoice from the supplier. Again, ensure that the correct VAT rate is selected in the Tax Rate section.
Creating a Match Manually
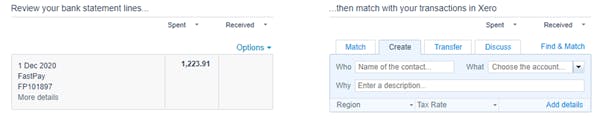
If Xero doesn’t suggest a match - as above - you’ll need to enter the details yourself using the Who, What, and Why fields.
- Who: start typing the supplier or customer name. Xero will suggest existing contacts, or you can create a new one.
- What: choose the correct account code. Start typing and Xero will suggest options. If you’re unsure, ask your accountant — or create a new code if needed.
- Why: add a short description to help you identify the transaction later.

Once you’re happy, click OK and the item will be reconciled.
If a transaction relates to more than one thing, click Add details and split the amount between multiple codes.
Xero may also suggest a likely match based on past behaviour. These suggestions become more accurate over time, but it’s still important to review each one before clicking OK.

Adding Receipts and Invoices
We strongly recommend attaching receipts or invoices to your transactions - especially if you’re reclaiming VAT. It makes life much easier if HMRC ever asks for supporting evidence.
To attach a document:
- Click Add details.
- Click the paperclip icon.
- Upload your file.
You can also email documents directly into Xero, which I’ll cover in a future blog post.
Invoicing and Billing Matches
If you use Xero’s invoicing features, the software will automatically try to match bank transactions to invoices or bills.
Green matches indicate Xero is confident it has found the right item. However, always double‑check, especially if you issue multiple invoices for the same amount. If there are several possible matches, Xero will let you view the alternatives.
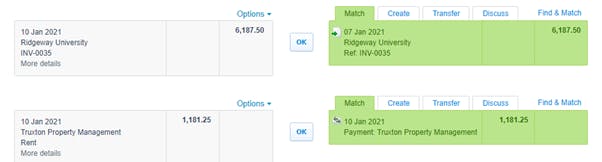
The second transaction above is where a bill has been added. This is not functionality that many clients use within Xero. If you buy or receive goods at a standard price and there is more than one Invoice or Bill in Xero for this amount, there will be an option to look at other matches.
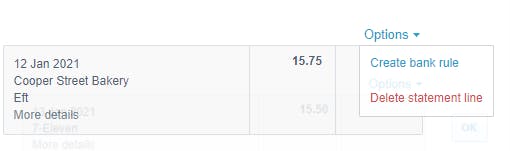
Using Bank Rules
Bank rules can save a huge amount of time if you have regular, predictable transactions - for example, your Xero subscription.

In order to set up a rule, select Options above the payment you want to set up a rule for and then Create Bank Rule.
Xero will then automatically try to create a spend money or receive money rule based on whether you spent or received the cash for the item you selected. You can have several different conditions to when the rule is applied.
For example, if the Description varies from month to month such as Xero March 2020, Xero April 2020 etc, then I would change the Description field to “Contains” and then the text box just to “Xero”. I personally like to have only one condition for each rule to enable it to be used as widely as possible. You can always make the description more narrow later if the rule applies to too many transactions.
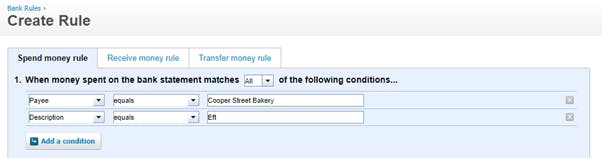
In the second section, you need to select the Contact. Start typing their name, and if you've dealt with them previously, they should appear. If not, you can create a new contact.

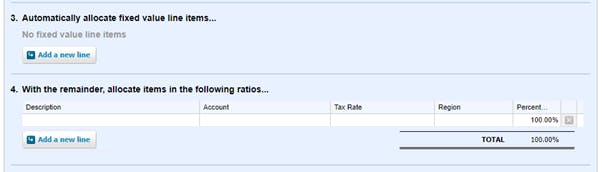
The important sections here are 3 and 4. There are various ways of splitting the amount. If it's always one thing (e.g. your electricity bill is always coded completely to electricity) then select 100% to account Electricity in section 4.
If the bill is always split - for example, 75% marketing costs and 25% consultancy - this can be allocated in section 4.
You can also allocate a fixed amount to certain codes. For example, if you pay a flat monthly fee for line rental, but a variable amount for calls, add the fixed amount in section 3 with the variable amount coded in section 4.
Section 5 allows you to define how the Reference is set from a number of dropdown options.

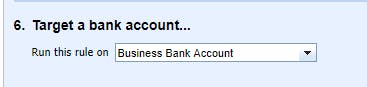
Section 6 allows you to define which bank accounts the rule should apply to.
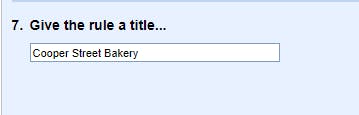
Finally, you can name the rule, making it easier to find and amend later. When you click Save, you'll be taken back to the bank reconciliation screen. Your transaction should hopefully now want you to apply your new rule.
Getting Started
Hopefully this gives you a solid understanding of how to reconcile your bank account in Xero. The best way to learn is simply to start working through your transactions and get used to the flow. And of course, your accountant should always be happy to help with any questions along the way.

